I’ve had this Bob Marley novelty tee for so long I don’t even remember where I bought it from (probably some online pop up or Hot Topic). I’ve had it over a decade. This tee was like an old boyfriend; I loved it so much but there was just some things about it that really irked me. I loved this shirt too much to donate/ throw away. I wanted to reframe my feelings about my shirt (by upcycling it).

The main detail I wanted to change was how low the screen print was placed on the shirt. I thought raising it higher on the bust would be more flattering on me. Initially, I wanted to make a muscle tee with shoulder pads but didn’t have enough material after I lowered the neckline, so I had to make it a tank.
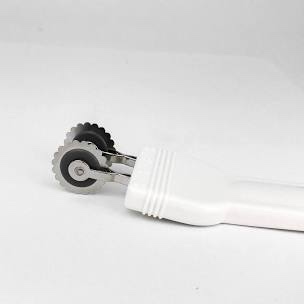
I started with taking the seams apart. I used another tank to copy a new (lower) neckline by layering wax paper (wax facing down) on the old tee and placing the tee I was copying on top of the wax paper. Next, I used a serrated double tracing wheel to transfer the markings to the Marley tee. (A serrated double tracing is useful to marking the stitching line and seam allowance at the same time.) I did this for the front and the back pieces since the neckline in the back is higher.
After I marked the new neckline, I cut the fabric and restitched the seams using 1/4” seam allowance (that was all the room I had). I also reused the original ribbed neckband, stitching it to the new neckline. I finished the seams with a serger/ overlocker. I used a 1/2” coverstitch hem for both armscye and bottom hem. If no coverstitch is available, you can use a zigzag stitch or fold the hem over twice, so that the raw edge is not exposed.
With 2-3 hours of work, I was able to change my shirt from I liked conceptually into something I actually want to wear. I’ve learned you can’t change people, but you can definitely change a shirt! Check out my reel for the process.
